Batch rendering in Octane
There are always some things, that are hidden from first glimpse & sometimes even looking closer doesn’t reveal too much either.
If You have multiple shots to render, constantly checking if one is done to be able save the result & start next render, this will be useful for You. Consider this while You will be doing material, lighting or other tests too. Rather than sitting & looking to noise fading away You can set up the scene, leave it to render multiple shots & go for a break or do other work without any interruptions. When You are going to come back all the work will be done, multiple pictures will be saved for You without any need to wait one by one till they are done.
Batch rendering isn’t a new concept at all. Some programs have inbuilt functionality, some have external plugins that help to deal with this task. In Octane Render You will not find any button or function in the interface (just yet), leaving You to dream if such function exists at all & let’s face the fact not all of us like reading manuals or going through every single topic in forums (as that takes quite some time). So how to do that?
Actually there isn’t one but two different ways of making that happen. Let’s take a look at both of them.
Batch rendering using command line options
That’s the way I used to do this. Octane manual’s chapter about command line reveals a lot of parameters that can be controlled.
You can get pretty flexible with the way You approach this, but it can get a bit complex. Personally I’m one of those who likes simplicity (not only in architecture, web design, etc). Especially when You haven’t got a trained eye to spot mistakes fast it’s always wise to keep code as short as possible, avoiding any errors or minimising customisation time while trying to reuse the code.
Working with render targets in Octane gives You a possibility to define every single aspect whether it’s lighting, camera, environment, geometry, render resolution, post processing, etc. In this way (if You have render targets ready) for automating the output (batch rendering) all You need to do is simply define scene, image format and directory. The code is pretty simple:
“C:\…\octane.exe” “C:\…\oo1.ocs” -q -t 1st -s 100 -o “C:\…\1st.png” -e
“C:\…\octane.exe” path to Octane instalation folder;
C:\…\oo1.ocs” path to .ocs file for Octane;
-q quiet mode, because of this You will not see Octanes window poping up (basicly saying to render in a background);
-t 1st take render target named 1st;
-s 100 render it to 100 samples;
-o “C:\…\1st.png” output rendered image to directory & name – 1st;
-e exit the program.
That is the example to render one Render Target, & if You want to have multiple images simply duplicate the line, change the output name, render target, samples (or even add more arguments) and save it. I usually write the code as .bat file. When that is done, single click and it starts the batch process (opening program, importing file, rendering, saving out, exiting & again..).
So that’s one way of doing things. The way I still use up to this day. But there is another, new way.
Batch render with Lua scripting.
One of new additions to Octane Render (since version 1.5) was a scripting language named Lua. I don’t know too much about code – this is still something to learn for me (I’m more a guy that pushes buttons or at best presses a shortcut on the keyboard..honestly, anything more complex and I’m totally hopelessly lost).
OTOY’s programmers made a sub forum dedicated to this topic where You will be able to find useful things. Developers even talking about integrating script sharing possibilities into Octane Render itself in similar fashion as material librarary is. It remains to be seen how that works, but I have to say I’m looking forward to this.
Let’s take a look to what some users have already shared complimenting this theme. If You are licensed forum user then You should have an access to Lua scripting sub forum & among those threads there’s one about Bach Rendering. I’ll not add the script itself to download here, ‘cos You can always get the most recent version of it from those who have skills to tweak it to perfection. Unlike command line option this will have UI elements greatly simplifying the way You do things (no need to go & change the code anymore).
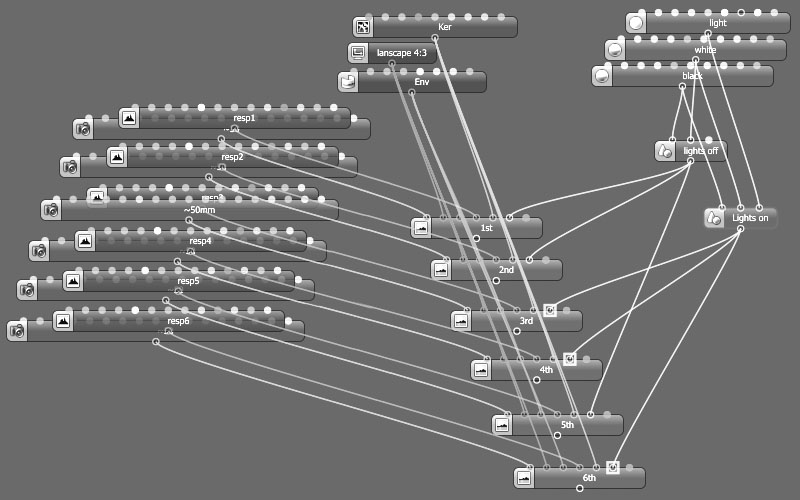
So let’s take a scene, give a spint for this script. In this case I have six render targets. Already have downloaded the script.
Let’s open Editor via Script menu. Second icon in the window (or CTRL+O) will open script from file, then simply by press Execute button (or CTRL+E). Table with more options will jumpt out. Select which render targets You want to be rendered & in what formats to be saved. Define the path for output & choose samples/pixel. Once You press Apply button indication bar will give You a feedback on the progress & when it’s finished all the pictures are going to be found in provided directory.
I think using this script is way more enjoying than tweaking parameters for the command line everytime You create new render target or save file in different name & I’m looking forward to use this new way of dealing with Batch Rendering even more!
Thanks for OTOY’s forum users (Piotr a.k.a. Rosol, MB & also developer Thomas a.k.a. Stratified) who wrote, tweaked & shared this useful scipt.
Back to the Home Page